NSDT工具推荐: Three.js AI纹理开发包 - YOLO合成数据生成器 - GLTF/GLB在线编辑 - 3D模型格式在线转换 - 可编程3D场景编辑器 - REVIT导出3D模型插件 - 3D模型语义搜索引擎 - AI模型在线查看 - Three.js虚拟轴心开发包 - 3D模型在线减面 - STL模型在线切割 - 3D道路快速建模
这篇文章是WebGL系列的延续。 第一个是从基础知识开始的,上一个是向纹理提供数据。 如果你还没有阅读过这些内容,请先查看它们。
在上一篇文章中,我们讨论了如何从 JavaScript 向纹理提供数据。 在本文中,我们将使用 WebGL 渲染纹理。 请注意,图像处理部分简要介绍了该主题,但让我们更详细地介绍它。
渲染到纹理非常简单。 我们创建一定大小的纹理:
// create to render to
const targetTextureWidth = 256;
const targetTextureHeight = 256;
const targetTexture = gl.createTexture();
gl.bindTexture(gl.TEXTURE_2D, targetTexture);

{
  // define size and format of level 0
  const level = 0;
  const internalFormat = gl.RGBA;
  const border = 0;
  const format = gl.RGBA;
  const type = gl.UNSIGNED_BYTE;
  const data = null;
  gl.texImage2D(gl.TEXTURE_2D, level, internalFormat,
                targetTextureWidth, targetTextureHeight, border,
                format, type, data);

  // set the filtering so we don't need mips
  gl.texParameteri(gl.TEXTURE_2D, gl.TEXTURE_MIN_FILTER, gl.LINEAR);
  gl.texParameteri(gl.TEXTURE_2D, gl.TEXTURE_WRAP_S, gl.CLAMP_TO_EDGE);
  gl.texParameteri(gl.TEXTURE_2D, gl.TEXTURE_WRAP_T, gl.CLAMP_TO_EDGE);
}
注意数据是如何为空的。 我们不需要提供任何数据。 我们只需要 WebGL 来分配纹理。
接下来我们创建一个帧缓冲区。 帧缓冲区只是附件的集合。 附件是纹理或渲染缓冲区。 我们之前已经讨论过纹理。 渲染缓冲区与纹理非常相似,但它们支持纹理不支持的格式和选项。 此外,与纹理不同,你不能直接使用渲染缓冲区作为着色器的输入。
让我们创建一个帧缓冲区并附加我们的纹理:
// Create and bind the framebuffer
const fb = gl.createFramebuffer();
gl.bindFramebuffer(gl.FRAMEBUFFER, fb);

// attach the texture as the first color attachment
const attachmentPoint = gl.COLOR_ATTACHMENT0;
gl.framebufferTexture2D(
    gl.FRAMEBUFFER, attachmentPoint, gl.TEXTURE_2D, targetTexture, level);
就像纹理和缓冲区一样,创建帧缓冲区后,我们需要将其绑定到 FRAMEBUFFER 绑定点。 之后,与帧缓冲区相关的所有函数都会引用绑定在那里的任何帧缓冲区。
通过我们的帧缓冲区绑定,任何时候我们调用 gl.clear、 gl.drawArrays 或 gl.drawElements,WebGL 都会渲染到我们的纹理而不是画布。
让我们将之前的渲染代码变成一个函数,这样我们就可以调用它两次。 一次渲染到纹理,再次渲染到画布。
function drawCube(aspect) {
  // Tell it to use our program (pair of shaders)
  gl.useProgram(program);

  // Turn on the position attribute
  gl.enableVertexAttribArray(positionLocation);

  // Bind the position buffer.
  gl.bindBuffer(gl.ARRAY_BUFFER, positionBuffer);

  // Tell the position attribute how to get data out of positionBuffer (ARRAY_BUFFER)
  var size = 3;          // 3 components per iteration
  var type = gl.FLOAT;   // the data is 32bit floats
  var normalize = false; // don't normalize the data
  var stride = 0;        // 0 = move forward size * sizeof(type) each iteration to get the next position
  var offset = 0;        // start at the beginning of the buffer
  gl.vertexAttribPointer(
      positionLocation, size, type, normalize, stride, offset)

  // Turn on the texcoord attribute
  gl.enableVertexAttribArray(texcoordLocation);

  // bind the texcoord buffer.
  gl.bindBuffer(gl.ARRAY_BUFFER, texcoordBuffer);

  // Tell the texcoord attribute how to get data out of texcoordBuffer (ARRAY_BUFFER)
  var size = 2;          // 2 components per iteration
  var type = gl.FLOAT;   // the data is 32bit floats
  var normalize = false; // don't normalize the data
  var stride = 0;        // 0 = move forward size * sizeof(type) each iteration to get the next position
  var offset = 0;        // start at the beginning of the buffer
  gl.vertexAttribPointer(
      texcoordLocation, size, type, normalize, stride, offset)

  // Compute the projection matrix

  var aspect = gl.canvas.clientWidth / gl.canvas.clientHeight;
  var projectionMatrix =
      m4.perspective(fieldOfViewRadians, aspect, 1, 2000);

  var cameraPosition = [0, 0, 2];
  var up = [0, 1, 0];
  var target = [0, 0, 0];

  // Compute the camera's matrix using look at.
  var cameraMatrix = m4.lookAt(cameraPosition, target, up);

  // Make a view matrix from the camera matrix.
  var viewMatrix = m4.inverse(cameraMatrix);

  var viewProjectionMatrix = m4.multiply(projectionMatrix, viewMatrix);

  var matrix = m4.xRotate(viewProjectionMatrix, modelXRotationRadians);
  matrix = m4.yRotate(matrix, modelYRotationRadians);

  // Set the matrix.
  gl.uniformMatrix4fv(matrixLocation, false, matrix);

  // Tell the shader to use texture unit 0 for u_texture
  gl.uniform1i(textureLocation, 0);

  // Draw the geometry.
  gl.drawArrays(gl.TRIANGLES, 0, 6 * 6);
}
请注意,我们需要传递用于计算投影矩阵的方面,因为我们的目标纹理具有与画布不同的方面。
我们是这样调用它的:
// Draw the scene.
function drawScene(time) {

  ...

  {
    // render to our targetTexture by binding the framebuffer
    gl.bindFramebuffer(gl.FRAMEBUFFER, fb);

    // render cube with our 3x2 texture
    gl.bindTexture(gl.TEXTURE_2D, texture);

    // Tell WebGL how to convert from clip space to pixels
    gl.viewport(0, 0, targetTextureWidth, targetTextureHeight);

    // Clear the attachment(s).
    gl.clearColor(0, 0, 1, 1);   // clear to blue
    gl.clear(gl.COLOR_BUFFER_BIT| gl.DEPTH_BUFFER_BIT);

    const aspect = targetTextureWidth / targetTextureHeight;
    drawCube(aspect)
  }

  {
    // render to the canvas
    gl.bindFramebuffer(gl.FRAMEBUFFER, null);

    // render the cube with the texture we just rendered to
    gl.bindTexture(gl.TEXTURE_2D, targetTexture);

    // Tell WebGL how to convert from clip space to pixels
    gl.viewport(0, 0, gl.canvas.width, gl.canvas.height);

    // Clear the canvas AND the depth buffer.
    gl.clearColor(1, 1, 1, 1);   // clear to white
    gl.clear(gl.COLOR_BUFFER_BIT | gl.DEPTH_BUFFER_BIT);

    const aspect = gl.canvas.clientWidth / gl.canvas.clientHeight;
    drawCube(aspect)
  }

  requestAnimationFrame(drawScene);
}
结果如下:
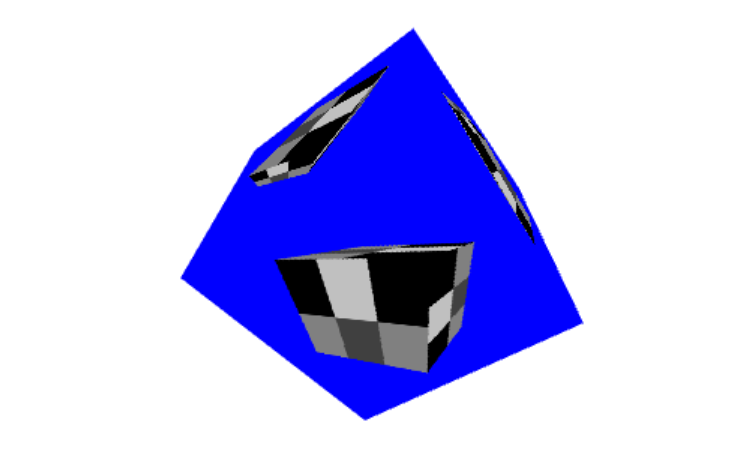
记住调用 gl.viewport 并将其设置为渲染对象的大小非常重要。 在这种情况下,我们第一次渲染纹理,因此我们设置视口来覆盖纹理。 第二次我们渲染到画布上,因此我们将视口设置为覆盖画布。
类似地,当我们计算投影矩阵时,我们需要为要渲染的对象使用正确的方面。 我花费了无数个小时的调试时间,想知道为什么某些东西渲染得很有趣或者根本不渲染,最后却发现我忘记了一个或两个调用 gl.viewport 并计算正确的方面。 我很容易忘记,现在我尽量不在自己的代码中直接调用 gl.bindFramebuffer 。 相反,我创建了一个函数来执行类似的操作:
function bindFramebufferAndSetViewport(fb, width, height) {
   gl.bindFramebuffer(gl.FRAMEBUFFER, fb);
   gl.viewport(0, 0, width, height);
}
然后我只使用该函数来更改我要渲染的内容。 这样我就不会忘记。
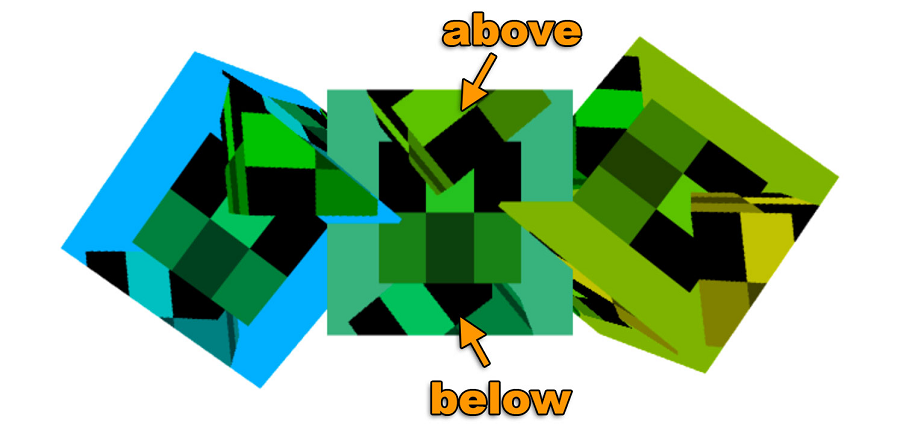
需要注意的一件事是我们的帧缓冲区上没有深度缓冲区。 我们只有纹理。 这意味着没有深度测试,3D 将无法工作。 如果我们画 3 个立方体,我们就能看到这一点:

如果你看一下中心的立方体,会看到 3 个垂直的立方体绘制在其上,一个在后面,一个在中间,另一个在前面,但我们将所有 3 个立方体绘制在相同的深度。 观察画布上绘制的 3 个水平立方体,你会发现它们彼此正确相交。 这是因为我们的帧缓冲区没有深度缓冲区,但我们的画布有:
要添加深度缓冲区,我们需要创建一个深度缓冲区并将其附加到我们的帧缓冲区:
// create a depth renderbuffer
const depthBuffer = gl.createRenderbuffer();
gl.bindRenderbuffer(gl.RENDERBUFFER, depthBuffer);

// make a depth buffer and the same size as the targetTexture
gl.renderbufferStorage(gl.RENDERBUFFER, gl.DEPTH_COMPONENT16, targetTextureWidth, targetTextureHeight);
gl.framebufferRenderbuffer(gl.FRAMEBUFFER, gl.DEPTH_ATTACHMENT, gl.RENDERBUFFER, depthBuffer);
结果如下:
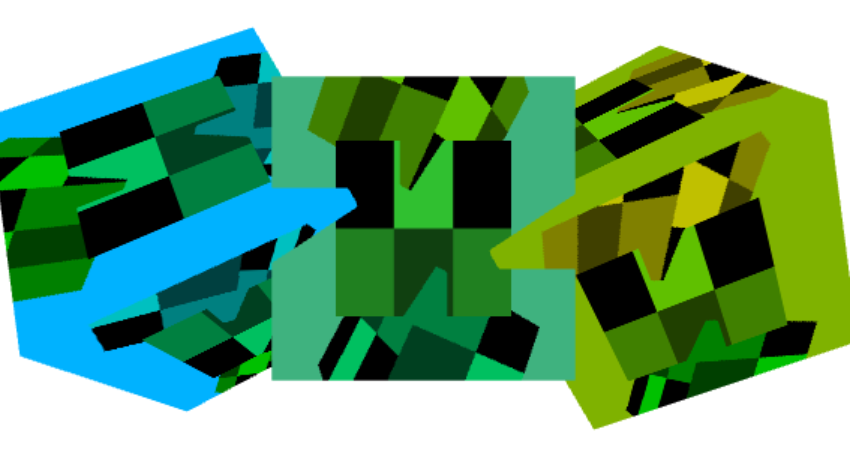
现在我们已经将深度缓冲区附加到帧缓冲区,内部立方体正确相交:
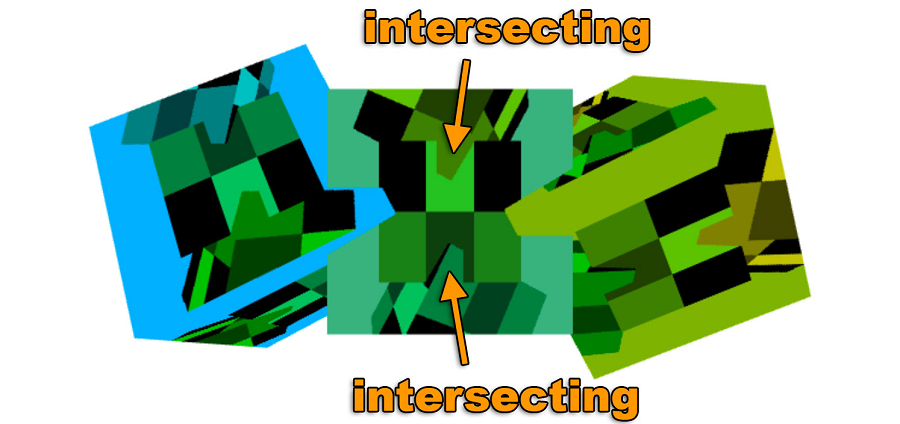
值得注意的是,WebGL 仅承诺 3 种附件组合工作。 根据规范,唯一有保证的附件组合是:
- COLOR_ATTACHMENT0 = RGBA/UNSIGNED_BYTE 纹理
- COLOR_ATTACHMENT0 = RGBA/UNSIGNED_BYTE 纹理 + DEPTH_ATTACHMENT = DEPTH_COMPONENT16 渲染缓冲区
- COLOR_ATTACHMENT0 = RGBA/UNSIGNED_BYTE 纹理 + DEPTH_STENCIL_ATTACHMENT = DEPTH_STENCIL 渲染缓冲区
对于任何其他组合,你必须检查用户的系统/GPU/驱动程序/浏览器是否支持该组合。 要检查你是否创建了帧缓冲区,请创建并附加附件,然后调用:
var status = gl.checkFramebufferStatus(gl.FRAMEBUFFER);如果状态为 FRAMEBUFFER_COMPLETE,则该附件组合适用于该用户。 否则它不起作用,你将不得不做其他事情,例如告诉用户他们运气不好或回退到其他方法。
Canvas本身实际上是一个纹理
这只是小事,但浏览器使用上述技术来实现画布本身。 他们在幕后创建颜色纹理、深度缓冲区、帧缓冲区,然后将其绑定为当前帧缓冲区。 你进行渲染并绘制到该纹理中。 然后,他们使用该纹理将画布渲染到网页中。
原文链接:WebGL Rendering to a Texture
BimAnt翻译整理,转载请标明出处